http://php.net/manual/en/function.filesize.php

I have a cli script running that use the  filesize function on a ssh2_sftp connection. It has the >2Gb limit  issue, while it does not have that issue locally. I have managed to get  around this by doing a "du -sb" command through ssh2_shell.

The following function takes the ssh2_connect resource and the path as  input. It may not be neat, but it solves the problem for the moment.

function fSSHFileSize($oConn, $sPath) {
    if(false !== ($oShell = @ssh2_shell($oConn, 'xterm', null, 500, 24, SSH2_TERM_UNIT_CHARS))) {
        fwrite($oShell, "du -sb '".$sPath."'".PHP_EOL);
        sleep(1);
        while($sLine = fgets($oShell)) {
            flush();
            $aResult[] = $sLine;
        }
        fclose($oShell);
        $iSize = 0;
        if(count($aResult) > 1) {
            $sTemp = $aResult[count($aResult)-2];
            $sSize = substr($sTemp, 0, strpos($sTemp, chr(9)));
            if(is_numeric(trim($sSize))) {
                $iTemp = (int)$sSize;
                if($iTemp > "2000000000") $iSize = $iTemp;
            }
        }
        return $iSize;
    }
    return 0;
}
?>
Saturday, September 24, 2011
PHP Command Line script - cli script
php filesize
Friday, September 23, 2011
Joomla Tooltip - WOW, badass
http://www.nonumber.nl/extensions/tooltips?tab=download
Tooltip with title and text
Hover here to see tooltip
{tip Cool...::This is a tooltip!}Hover here to see tooltip{/tip} Tooltip with only text
Hover here to see tooltip
{tip This is a tooltip!}Hover here to see tooltip{/tip} Tooltip with rich text
Hover here to see tooltip
{tip You can use bold, italic, underlined text.
Or use enters and any other markup you want!}Hover here to see tooltip{/tip}
Tooltip with images
You can even make images show in the tooltips and use this - for example - as a gallery:


{tip }{/tip} {tip }{/tip}
{tip }{/tip} {tip }{/tip}
{tip }{/tip} {tip }{/tip}
 Or simply place the html in the {tip} tags, instead of the large images, like:
{tip  }
} {/tip}
{tip  }
} {/tip}
{tip  }
} {/tip}
{tip  }
} {/tip}
{tip  }
} {/tip}
{tip  }
} {/tip}
 }
} }
} }
} }
} }
} }
}Thursday, September 22, 2011
Wednesday, September 21, 2011
Joomla 1 to 1.5 code migration links
CODE MIGRATION
http://www.kanich.net/radio/site/joomla-migration
http://docs.joomla.org/Upgrading_a_Joomla!_1.0_template_to_Joomla!_1.5
http://www.kanich.net/radio/site/joomla-migration/migration-table
http://www.waltercedric.com/joomla-mainmenu-247/339-joomla-15/1175-components-code-migration-to-joomla-15.html
http://www.kanich.net/radio/site/joomla-migration
http://docs.joomla.org/Upgrading_a_Joomla!_1.0_template_to_Joomla!_1.5
http://www.kanich.net/radio/site/joomla-migration/migration-table
http://www.waltercedric.com/joomla-mainmenu-247/339-joomla-15/1175-components-code-migration-to-joomla-15.html
Saturday, September 17, 2011
Joomla - ROKFeatureTable - really cool
http://demo.rockettheme.com/sep10/extensions/styled-extensions/rokfeaturetable
http://www.rockettheme.com/forum/index.php?f=403&t=108793&rb_v=viewtopic
How To Configure RokFeatureTable Module
1. If you still don't have RokFeatureTable installed, the module can be downloaded with the other Omnicron extensions.
2. In your Joomla administrator panel, go to: Extensions → Module Manager → RokFeatureTable
3. Here we can set the optional parameters:
3. a) Module Class Suffix : You can put any module suffix if necessary. In Omnicron template, you might want to put "featuretable" (without quotes)
3. b) Highlight Column : Choose the column you want to highlight by default or choose none if you don't want any column gets highlighted. For example, if we choose "Column 3", it will be shown like the following:
3. c) Preset Templates : There are 2 presets templates for the table, "Browsers" and "Price Table". To make the setup easier and faster, let's load the sample data by clicking the Import button.
The "Price Table" template is the one shown in the demo site and the following one is the screenshot for "Browsers" table.
4. Configure the layout setup. Here, you will be presented with a interactive grid. You can add/remove columns and rows by following below steps.
4. a) To add column, click the + button like shown in the following screenshot. To remove the column, hover the mouse on the column you want to delete and click the red "Remove" link under it.
4. b) To add row, click the + button and to remove the row, click the - like shown in the following screenshot.
5. You may insert raw text or HTML into the row input boxes.
6. Click the class, subline, link or style buttons to activate new input boxes.
6. a) Class : Wrapping the text inside a div with specified class, for example:
It will produce the following html code:
6. b) Subline : Adding a subline, for example:
It will produce the following html code:
6. c) Link : Wrapping the text inside a link with specified url, for example:
6. d) Style : Adding inline css style, for example:
It will produce the following html code:
http://www.rockettheme.com/forum/index.php?f=403&t=108793&rb_v=viewtopic
RokFeatureTable is a template integrated module that is designed to show tabular data in a stylistic, and easy to present manner. The module is downloadable with the other Omnicron extensions.

Core Features
- Unlimited Rows
- Extensive data control
- Highlight Column Control
- Assign custom classes
- Custom CSS styles
- Template specific layouts
Usage Examples
- Price Comparisons
- Feature Comparisons
- Service Matrix
Module Configuration
Edit the module from Admin → Extensions → Module Manager → RokFeatureTable.
- Module Class Suffix: Appends a class for individual styling - featuretable is used on this demo.
- Highlight Column: Select which of the columns is highlighted by default.
- Preset Templates: Load a predefined template layout.
- Layout Settings: See below

Layout Settings
Select Layout Settings to activate the javascript popup. Here you can have up to 6 column, and an unlimited number of rows. For each row you can define class, subline, link and style.

Forum Tutorial: Setting Up RokFeatureTable Module
How To Configure RokFeatureTable Module
1. If you still don't have RokFeatureTable installed, the module can be downloaded with the other Omnicron extensions.
2. In your Joomla administrator panel, go to: Extensions → Module Manager → RokFeatureTable
3. Here we can set the optional parameters:
3. a) Module Class Suffix : You can put any module suffix if necessary. In Omnicron template, you might want to put "featuretable" (without quotes)
 Viewed 4679 times")
3. b) Highlight Column : Choose the column you want to highlight by default or choose none if you don't want any column gets highlighted. For example, if we choose "Column 3", it will be shown like the following:
 Viewed 4678 times")
3. c) Preset Templates : There are 2 presets templates for the table, "Browsers" and "Price Table". To make the setup easier and faster, let's load the sample data by clicking the Import button.
 Viewed 4677 times")
The "Price Table" template is the one shown in the demo site and the following one is the screenshot for "Browsers" table.
 Viewed 4670 times")
4. Configure the layout setup. Here, you will be presented with a interactive grid. You can add/remove columns and rows by following below steps.
4. a) To add column, click the + button like shown in the following screenshot. To remove the column, hover the mouse on the column you want to delete and click the red "Remove" link under it.
 Viewed 4675 times")
4. b) To add row, click the + button and to remove the row, click the - like shown in the following screenshot.
 Viewed 4674 times")
5. You may insert raw text or HTML into the row input boxes.
 Viewed 4673 times")
6. Click the class, subline, link or style buttons to activate new input boxes.
6. a) Class : Wrapping the text inside a div with specified class, for example:
 Viewed 4668 times")
It will produce the following html code:
<div class="name">Free</div>
6. b) Subline : Adding a subline, for example:
 Viewed 4667 times")
It will produce the following html code:
6. c) Link : Wrapping the text inside a link with specified url, for example:
 Viewed 4661 times")
<a href="http://www.mozilla.com/en-US/firefox/all.html">Firefox</a>
6. d) Style : Adding inline css style, for example:
 Viewed 4668 times")
It will produce the following html code:
Wednesday, September 14, 2011
Joomla 1.5 Build Component Tutorial - 1
Lost Flirts - a Joomla 1.5 component from scratch
Hide Table of Contents for Paceville.com - The Coding
- Customizing Joomla 1.5
- Adding AJAX to Joomla 1.5 with jQuery
- Adding custom columns/fields to Joomla article, section and user
- Hardening the Joomla hacks
- Hijacking controllers and views in Joomla
- Search Engine Friendly urls in Joomla
- Facebook style information box with jQuery
- Image manipulation and watermarking in PHP with GD2
- Joomla! 1.5x Customization - Book review and general Joomla discussion
- Mailing with Joomla’s JMail
- Lost Flirts - a Joomla 1.5 component from scratch
- Facebook style photo tagging with jQuery, Ajax and Joomla
- Controlling form tabbing with jQuery
- Facebook style chat with jQuery and Joomla
- JQuery Joomla chat, adding online/offline and friendlist
Update: Paceville.com is now online to check out the interface go here.
Although I got a pretty good picture of how a Joomla component works when I did the extended user registration form it wasn’t really from scratch.
This time though it was time to try and create something from scratch, in a “proper” fashion. We need a Lost Flirts section which will basically be a simple web board where members can post short messages. Other members can then answer with direct messages.
Administrators need to be able to remove any post and the person who created a post needs to be able to remove it. There will however not be any admin interface for this one, the admin needs to be logged in to the front end to be able to remove flirts.

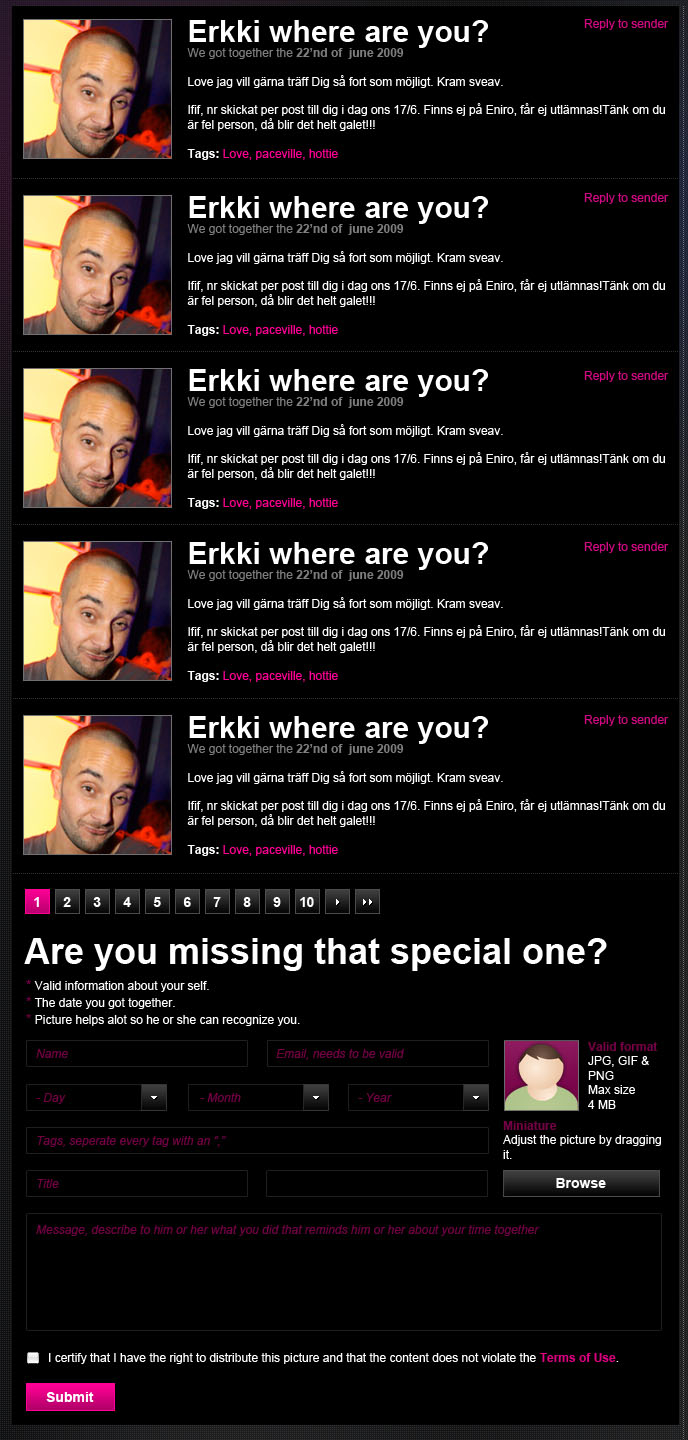
The whole interface will be contained on one page, first the posts at the top, then pagination controls and at the bottom the form. If a person is allowed to remove a post we will show a delete link to the right in each post. Note that the picture to the right is the designer’s take on what the interface should look like. Currently unregistered people won’t be able to use Lost Flirts, that will simplify the form a lot compared to what you see in the image.
Lets’ talk structure, we will have an entry point called lostflirts.php in components/com_lostflirts, this script is currently only loading the controller and will have the controller call a default task if none has been specified in the GET global array.
The controller and table is where everything is happening, the controller will in turn instantiate a view which renders the template, take a look at image to the right to see how everything is structured at the moment. This is kind of the default structure, very little configuration is needed to make stuff happen.
The table script tables/lostflirts.php is used as much as possible to separate concerns and to make as much use of the JTable class as possible.
Note that this tutorial will not go through any kind of packaging, prior to creating all the folders/scripts manually in the components directory I simply ran the following SQL:
- CREATE TABLE IF NOT EXISTS `jos_lostflirts` (
- `id` int(21) NOT NULL auto_increment,
- `userid` int(21) NOT NULL,
- `message` text NOT NULL,
- `date` timestamp NOT NULL default CURRENT_TIMESTAMP,
- `title` varchar(255) NOT NULL,
- `flirt_date` date NOT NULL,
- PRIMARY KEY (`id`)
- ) ENGINE=MyISAM DEFAULT CHARSET=utf8
-
- INSERT INTO `jos_components` (`name`, `link`, `menuid`, `parent`, `admin_menu_link`, `admin_menu_alt`, `option`, `ordering`, `admin_menu_img`, `iscore`, `params`, `enabled`) VALUES
- ('Lost Flirts', 'option=com_lostflirts', 0, 0, 'option=com_lostflirts', 'Lost Flirts', 'com_lostflirts', 0, 'js/ThemeOffice/component.png', 0, '', 1);
For more on packaging see here.
Let’s begin with the entry point lostflirts.php:
- defined('_JEXEC') or die('Restricted access');
- require_once (JPATH_COMPONENT.DS.'controller.php');
- $controller = new LostFlirtsController();
- $controller->registerDefaultTask('listFlirts');
- $controller->execute( JRequest::getCmd('task'));
- $controller->redirect();
Not much to add here in addition to what I’ve already stated above, we will render the task listFlirts if the $_GET[’task’] variable is empty.
Let’s move on to controller.php’s complete listing, discussion of each function is below:
- defined('_JEXEC') or die();
- jimport('joomla.application.component.controller');
- class LostFlirtsController extends JController{
- function __construct(){
- parent::__construct();
- $this->user =& JFactory::getUser();
- JTable::addIncludePath(JPATH_COMPONENT . DS . 'tables');
- }
-
- function redirListAll(){ $this->setRedirect(JRoute::_('index.php?option=com_lostflirts')); }
- function getTable(){ return JTable::getInstance('LostFlirts', 'Table'); }
-
- function create(){
- $post = JRequest::get('post');
- $row =& $this->getTable();
- if (!$row->bind($post))
- return JError::raiseWarning(500, $row->getError());
-
- $row->userid = $this->user->id;
- $row->flirt_date = "{$post['year']}-{$post['month']}-{$post['day']}";
-
- if (!$row->store())
- return JError::raiseWarning(500, $row->getError());
-
- $this->redirListAll();
- }
-
- function getLostFlirt($id){
- $tbl = $this->getTable();
- $tbl->load($id);
- return $tbl;
- }
-
- function delete(){
- $id = JRequest::getVar( 'id', 0, 'get', 'int' );
- if($this->isAdmin() || $this->user->id == $this->getLostFlirt($id)->userid)
- $this->getTable()->delete($id);
- $this->redirListAll();
- }
-
- function isAdmin(){
- return in_array($this->user->usertype, array('Super Administrator', 'Administrator', 'Manager', 'Author'));
- }
-
- function isRegistered(){ return $this->user->usertype == 'Registered' || $this->isAdmin(); }
-
- function listFlirts(){
- $doc = JFactory::getDocument();
- $doc->addScript("components/com_community/assets/window-1.0.pack.js");
- $doc->addScript("components/com_community/assets/script-1.2.pack.js");
-
- $get = JRequest::get('get');
- $view =& $this->getView('listflirts', 'html');
- $limit = 10;
- $offset = empty($get['offset']) ? 0 : $get['offset'];
- $view->assign("rows", $this->getTable()->getLostFlirtsList($offset, $limit));
- $view->assign("admin", $this->isAdmin());
- $view->assign("registered", $this->isRegistered());
- $view->assign("cur_usr_id", $this->user->id);
- $view->assign('pagination', $this->getPagination( $limit ));
- $view->display();
- }
-
- function getPagination($per_page){
- $get = JRequest::get('get');
- $total = $this->getTable()->getFlirtCount();
- if($total < $per_page)
- return array();
- $page_num = ceil($total / $per_page);
- $result = array();
- for($i = 0; $i < $page_num; $i++){
- $cur = array();
- $offset = round($i * $per_page);
- $cur['offset'] = $offset;
- $cur['limit'] = $per_page;
- $cur['current'] = $offset == $get['offset'];
- $result[] = $cur;
- }
- return $result;
- }
- }
Let’s discuss each function from top to bottom:
__construct: The constructor, we assign the currently logged in user to a member variable because it will be used a lot, we also include our table/model whose code we will get to further down.
redirListAll: Convenience function to redirect to the default task/function which is listFlirts.
getTable: Will instantiate our table.
create: Is called everytime the form is submitted, we do the customary bind() call but we will also set the userid field to the currently logged in user’s id. We will also set the posted flirt date to a normal MySQL date, with the help of the contents of the date dropdowns.
getLostFlirt: Will simply get a lost flirt row with the help of the passed argument.
delete: Will delete a lost flirt with the help of an id, will redirect to the full lost flirts listing. Note that only the owner of the flirt, or someone more powerful than just registered can do this.
isAdmin: Simple ACL function to check if we have something above Guest and Registered.
isRegistered: Simple check to see if the currently logged in user is Registered or higher.
listFlirts: The main function that always renders the GUI. First we get the current document, we then add some JomSocial JavaScripts that are needed in order for the direct messaging to work. We get the first 10 flirts and assign them to “rows” in the view, assign a boolean to the “admin” variable, if we’re above Registered it will be true, assign true to “registered” if we are have registered member. Finally we assign the pagination controls.
getPagination: Will get the pagination controls with the help of the total flirt count, current offset and limit/per page count (10). The current pagination is very simple, there are no page groups, only pages. Hopefully this will be enough since the content displayed is all about freshness, older flirts should be deleted by for instance a cron job, hence there will not be any need for page groups and such.
Let’s move over to the tables/lostflirts.php script:
- defined( '_JEXEC' ) or die( 'Restricted access' );
- class TableLostFlirts extends JTable{
- var $id = null;
- var $message = null;
- var $date = null;
- var $userid = null;
- var $flirt_date = null;
- var $title = null;
-
- function __construct(&$db){
- parent::__construct( '#__lostflirts', 'id', $db );
- }
-
- function getFlirtCount(){
- $sql
- = "SELECT DISTINCT COUNT(*) FROM #__users u, #__lostflirts f, #__community_users cu
- WHERE f.userid = u.id AND f.userid = cu.userid AND u.id = cu.userid"
;- $this->_db->setQuery($sql);
- return $this->_db->loadResult();
- }
-
- function getLostFlirtsList($offset, $limit){
- $sql
- = "SELECT DISTINCT * FROM #__users u, #__lostflirts f, #__community_users cu
- WHERE f.userid = u.id AND f.userid = cu.userid AND u.id = cu.userid
- GROUP BY f.id ORDER by f.date LIMIT $offset, $limit"
;- $this->_db->setQuery($sql);
- return $this->_db->loadObjectList();
- }
- }
Not much to add here, the only additional info we’ve added to what we already have in JTable is getFlirtCount and getLostFlirtsList which is doing exactly what their names imply.
That was quick, let’s take a look at the view.html.php script:
- defined( '_JEXEC' ) or die( 'Restricted access' );
- jimport( 'joomla.application.component.view');
- class lostflirtsViewlistFlirts extends JView{
- function display($tpl = null){
- parent::display($tpl);
- }
-
- function prettyDate($date){
- $stamp = strtotime($date);
- return date("j M, Y", $stamp);
- }
-
- function printArrToOptions(&$arr, $selected){
- foreach($arr as $item){
- $item = is_int($item) ? str_pad($item, 2, "0", STR_PAD_LEFT) : $item;
- if($item == $selected)
- echo "<option value=\"$item\" selected=\"selected\">$item</option>";
- else
- echo "<option value=\"$item\">$item</option>";
- }
-
- }
-
- function yearOptions($selected){
- $this_year = date('Y');
- $years = range($this_year - 2, $this_year);
- $selected = empty($selected) ? $this_year : $selected;
- $this->printArrToOptions($years, $selected);
- }
-
- function monthOptions($selected){
- $this_month = date('m');
- $selected = empty($selected) ? $this_month : $selected;
- $months = range('01', '12');
- $this->printArrToOptions($months, $selected);
- }
-
- function dayOptions($selected){
- $this_day = date('d');
- $selected = empty($selected) ? $this_day : $selected;
- $days = range('01', '31');
- $this->printArrToOptions($days, $selected);
- }
- }
We’ve got some helper functions here, this stuff should really be in some library instead of directly in the view. Better than in the template anyway 
You might also recognize this stuff from the extended user form. Anyway, the above functions are used to print the date drop downs where we have year, month and day of month.
Over to the template in tmpl/default.php:
- <?php // no direct access
- defined('_JEXEC') or die('Restricted access');
- ?>
-
- <?php foreach($this->rows as $usr): ?>
- <div class="flirt_cont">
- <img class="float_left" src="<?php echo $usr->avatar ?>" />
- <h1><?php echo $usr->title ?></h1>
- <div class="float_right">
- <?php if($this->registered && $this->cur_usr_id != $usr->userid): ?>
- <a href="javascript:void(0);" onclick="joms.messaging.loadComposeWindow('<?php echo $usr->userid ?>')">Reply</a>
- <?php endif ?>
- <?php if($this->admin || $usr->userid == $this->cur_usr_id): ?>
- <p>
- <a href="<?php echo JRoute::_("index.php?option=com_lostflirts&task=delete&id={$usr->id}") ?>">Delete</a>
- </p>
- <?php endif ?>
- </div>
- <p class="grey">We got together on <?php echo $this->prettyDate($usr->flirt_date) ?></p>
- <p><?php echo $usr->message ?></p>
- <div class="flirt_line"></div>
- </div>
- <?php endforeach; ?>
-
- <div class="flirt_cont">
- <div class="pagination_ctrl">
- <?php foreach($this->pagination as $num => $page): ?>
- <div class="pagination_<?php echo $page['current'] ? 'current' : 'normal' ?>">
- <a href="<?php echo JRoute::_("index.php?option=com_lostflirts&offset={$page['offset']}&limit={$page['limit']}") ?>">
- <?php echo $num + 1 ?>
- </a>
- </div>
- <?php endforeach ?>
- </div>
- <br/>
- <br/>
- <br/>
- <span class="super_headline">Are you missing that special one?</span>
- <br/>
- <?php if($this->registered): ?>
- <script>
- function postLostFlirt(){
- if(jQuery("#lostflirt_message").val().length < 5 || jQuery("#lostflirt_title").val().length < 5)
- jQuery("#lostflirt_errors").show("slow");
- else
- jQuery("#lostflirts_form").submit();
- return false;
- }
- </script>
- <div id="lostflirt_errors" class="hide pink">
- The title and/or message field is empty, or almost empty, write some more please.
- </div>
- <br/>
- <form id="lostflirts_form" method="post" action="<?php echo JRoute::_("index.php?option=com_lostflirts&task=create") ?>">
- <table>
- <tr>
- <td style="vertical-align: bottom;">
- <span class="pink">*</span> Date:
- </td>
- <td>
- Day:
- <select name="day" style="width:100px;">
- <?php echo $this->dayOptions() ?>
- </select>
-
- <span style="margin-left: 40px;">Month:</span>
- <select name="month" style="width:100px;">
- <?php echo $this->monthOptions() ?>
- </select>
-
- <span style="margin-left: 40px;">Year:</span>
- <select name="year" style="width:100px;">
- <?php echo $this->yearOptions() ?>
- </select>
- </td>
- </tr>
- <tr>
- <td style="vertical-align: bottom;">
- <span class="pink">*</span> Title:
- </td>
- <td>
- <input id="lostflirt_title" type="text" class="inputbox" name="title" value="" style="width:500px;"/>
- </td>
- </tr>
- <tr>
- <td style="vertical-align: top;">
- <br/>
- <span class="pink">*</span> Message:
- </td>
- <td>
- <textarea id="lostflirt_message" name="message" rows="40" style="width:500px;"></textarea>
- </td>
- </tr>
-
- <tr>
- <td></td>
- <td>
- <button class="btn_purple" onclick="postLostFlirt(); return false;">Submit</button>
- </td>
- </tr>
- </table>
- </form>
- <?php else: ?>
- <p>
- <a href="<?php echo CRoute::_( 'index.php?option=com_community&view=register' , false ); ?>">Sign up</a> for an account and find your lost flirt!
- </p>
- <?php endif ?>
- <br/>
- <br/>
- <br/>
- </div>
We loop through all the flirts and output them, we render the pagination controls and finally we render the create form. Note all the tests for displaying various controls, tests that are also repeated in the controller.
Note also the minimal JavaScript validation we perform with the help of jQuery, simply to avoid empty, or near empty, values.
Related Posts
Tuesday, September 13, 2011
All about groovy - Tabs at top, and how they have the facebook, twitter, and LIKE btns
All about groovy - Tabs at top, and how they have the facebook, twitter, and LIKE btns
http://www.oppapers.com/subjects/eight-preset-work-contours-page16.html
http://www.oppapers.com/subjects/eight-preset-work-contours-page16.html
Sunday, September 11, 2011
Create a MySQL Database With PHP - step by step - TUTORIAL - cool
Create a MySQL Database With PHP
http://www.php-mysql-tutorial.com/wikis/mysql-tutorials/create-a-mysql-database-with-php.aspxTo create a database use the mysql_query() function to execute an SQL query like this
$query = "CREATE DATABASE phpcake";
$result = mysql_query($query);
include 'closedb.php';
?>
Please note that the query should not end with a semicolon.
PHP also provide a function to create MySQL database, mysql_create_db(). This function is deprecated though. It is better to use mysql_query() to execute an SQL CREATE DATABASE statement instead like the above example.
If you want to create MySQL database using PHP mysql_create_db() function you can do it like this :
mysql_create_db('phpcake');
include 'closedb.php';
?>
If you want to create tables in the database you just created don't forget to call mysql_select_db() to access the new database.
Note: some webhosts require you to create a MySQL database and user through your website control panel (such as CPanel). If you get an error when trying to create database this might be the case.
Creating the TablesTo create tables in the new database you need to do the same thing as creating the database. First create the SQL query to create the tables then execute the query using mysql_query() function.
$query = 'CREATE DATABASE phpcake'; Of course when you need to create lots of tables it's a good idea to read the query from a file then save in $query variable instead of writing the query in your script.
$queryFile = 'myquery.txt'; $fp = fopen($queryFile, 'r');
|
Deleting a Database
As with creating a database, it is also preferable to use mysql_query() and to execute the SQL DROP DATABASE statement instead of using mysql_drop_db()
// ... do something here
$query = 'DROP DATABASE phpcake';
$result = mysql_query($query);
// ... probably do something here too
include 'closedb.php';
?>
After the database and the tables are ready it's time to put something into the database.
Table of Contents
- Getting Started with MySQL
- Connect to MySQL Database
- Create a MySQL Database With PHP
- Insert Data into a MySQL Database
- Retrieve Data From a MySQL Database
- MySQL Update and Delete
- Using PHP to Backup MySQL Databases
- Uploading Files To MySQL Database
- Content Management System ( CMS ) using PHP and MySQL
- User Authentication : Storing User ID's and Passwords In a MySQL Database
- Starting MySQL
- Add New MySQL User
- Create New MySQL Database
- Create a Table in MySQL
- Add Data to a MySQL Database
- Retrieve Data from MySQL Table
- Update and Delete in MySQL
Subscribe to:
Comments (Atom)